DIY: Modern Wood Fence and Gate (Courtyard Edition)

04/16/2013

DIY: Modern Wood Fence and Gate (Courtyard Edition) - myMCMlife.com

Almost 2 years ago, Jason and I built a modern horizontal plank wood fence at our previous house to enclose our back garden. We used the same technique to build this fence and gate to make the fourth “wall” of our courtyard. There were two major differences. 1. We only had a 12′ spanse to build. 2. We had concrete walls on both sides.

DIY: Modern Wood Fence and Gate (Courtyard Edition) - myMCMlife.com

There was only 1 post hole to dig. Hooray! Jason used our trusty old post hole digger. (Jason and that post hole digger have made holes for 2 fences prior to this!) We were only making our fence 4-4.5′ tall so we used a 6′ 4×4 pressure-treated post. The post hole should be 2′ deep.

DIY: Modern Wood Fence and Gate (Courtyard Edition) - myMCMlife.com

After making sure it was level, we added a few braces to keep it in place before adding the dry concrete mix and water into the post hole. Jason also added a little concrete mix and water under the post.

DIY: Modern Wood Fence and Gate (Courtyard Edition) - myMCMlife.com

Next we attached two 2x4s to the side of the house. The bottom piece was going into the concrete block foundation of the house.

DIY: Modern Wood Fence and Gate (Courtyard Edition) - myMCMlife.com

Drilling screws into concrete is not easy! We used these pretty blue concrete screws.

DIY: Modern Wood Fence and Gate (Courtyard Edition) - myMCMlife.com

Jason pre-drilled the holes for the screws. He opted to drill into the mortar to make it a little bit easier.

DIY: Modern Wood Fence and Gate (Courtyard Edition) - myMCMlife.com

Once that was secure, Jason added a second, longer 2×4 along the house. This one should have been easier because it was only going through wood (the hardibacker siding, the corner beam in our garage and the shorter 2×4 below. We borrowed this powerful hammer drill from a friend (necessary for drilling into concrete) and it was so powerful it stripped our drill bits and one of the outdoor screw heads. It seems like there is always something that goes awry on a project like this. Thankfully, he was finally able to get it secured to the house with a combination of this drill, every star drill bit we own and our wimpy Ryobi drill. The screw that was stripped was cut off with a hack saw.

DIY: Modern Wood Fence and Gate (Courtyard Edition) - myMCMlife.com

Another 2×4 was attached to the concrete block wall of the courtyard. Everything went smoothly with this one so I didn’t have time to take any photos.

DIY: Modern Wood Fence and Gate (Courtyard Edition) - myMCMlife.com

I don’t know if it’s the correct carpentry term but we call the horizontal boards planks (as opposed to pickets on a vertical fence) and to differentiate between posts and planks. Adding the planks went every quickly since we’ve done this part many times before. We started at the bottom, putting the plank as close to the ground as possible and leveling it.

DIY: Modern Wood Fence and Gate (Courtyard Edition) - myMCMlife.com

We used 8′ untreated 1x4s. (Our last fence we used 1×3 ferring strips.) They’re cheap…around $1.20 a piece at Lowes. (Side note: in our experience Lowes has much better quality wood than Home Depot.) Jason used a nail gun to put four nails into each plank at the 4×4 post end and 3 nails into each plank at the 2×4 end. We work together doing this part and it moves rhythmically:

I position the plank into place.
Jason places the spacer between the planks.
Jason fires the nails into place.
I position the spacer at the other end of the plank.
Jason fires the nails into place.
Jason removes the spacer.
(Repeat.)
15x in this instance.

DIY: Modern Wood Fence and Gate (Courtyard Edition) - myMCMlife.com

Anything sturdy and square can be used as a spacer. Since it was a fairly common question about our last fence project, I made a point of taking a picture. We used a plastic grout sample that was left at our house after construction. We have a bunch of them and it was quite convenient to have two so we could leave one at each end of the fence. They provided a gap of about 1/4″. It’s hard to see in the picture below because it’s brown…

DIY: Modern Wood Fence and Gate (Courtyard Edition) - myMCMlife.com

We added another vertical 2×4 on the back side of the fence to keep the planks straighter. This 2×4 post is pressure treated but we didn’t put it into the ground. It’s only helping to keep the planks straight, not supporting the weight of the fence.We used the spacer again to make sure the gap between the planks was consistant. They’re often slightly bowed so we pushed and pulled to get them as straight as possible before nailing. Where the gap was too small, we used a pry bar to move the planks apart enough to fit the spacer.

DIY: Modern Wood Fence and Gate (Courtyard Edition) - myMCMlife.com

Let’s step back and admire our work for a second. Ahh…

DIY: Modern Wood Fence and Gate (Courtyard Edition) - myMCMlife.com

Because we used 8′ planks, we made sure the space between the posts was slightly less than 8′. (If you’re building a fence with more than two posts, check out what we did here…I even have diagrams.)

DIY: Modern Wood Fence and Gate (Courtyard Edition) - myMCMlife.com

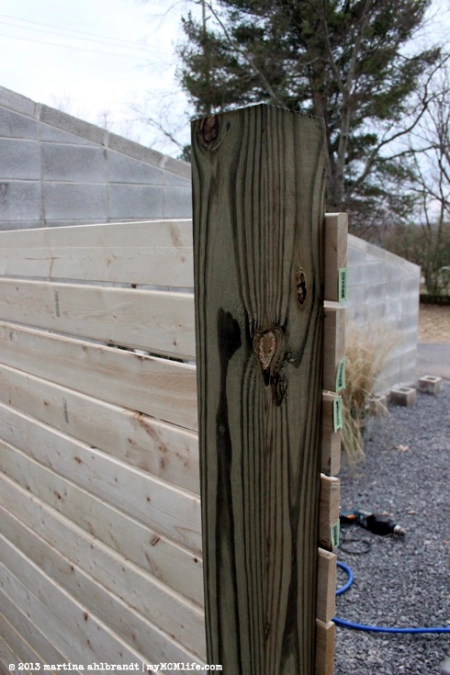
We wanted the planks to be flush with the 4×4 post and we made a chalk line where they needed to be cut.

DIY: Modern Wood Fence and Gate (Courtyard Edition) - myMCMlife.com DIY: Modern Wood Fence and Gate (Courtyard Edition) - myMCMlife.com

Jason used his circular saw for this. It’s a bit awkward, especially close to the ground. There may be a better way but this works for us.

DIY: Modern Wood Fence and Gate (Courtyard Edition) - myMCMlife.com

I always insist on the safety glasses. I like how Jason tucks his pencil into his hat.

DIY: Modern Wood Fence and Gate (Courtyard Edition) - myMCMlife.com DIY: Modern Wood Fence and Gate (Courtyard Edition) - myMCMlife.com

I didn’t do a very good job documenting the gate building process. (We started this project after Ali went down for her nap around 1pm on a Saturday and at this point 3 hours later, she was awake so she could “help” us.) We built a frame out of 2x4s just a bit (maybe 1″ both way) smaller than the opening for the gate. The extra 2x4s down the middle and diagonally (that I didn’t photograph here) help the gate stay square. We attached planks in the same way as the fence – starting first with the outside ends, using the spacer, and then the middle post, also using the spacer, using a pry bar as needed.

DIY: Modern Wood Fence and Gate (Courtyard Edition) - myMCMlife.com

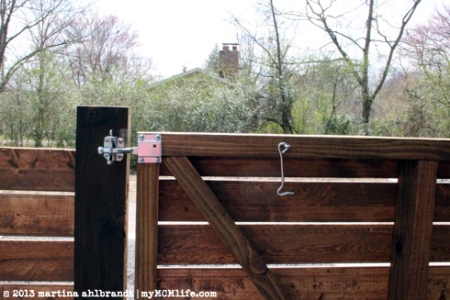
Once it was hung, I took a picture of the back side so you can see the two diagonal pieces of 2×4 we added. I’m sure there is a simple way to calculate those angles and cut them but we had a heck of a time and ended up just experimenting until we got some angles that worked. It was pretty amusing! Jason hung the gate with three hinges while I was inside with Ali so I didn’t get a picture of that process. How he did that himself, I have no idea!

DIY: Modern Wood Fence and Gate (Courtyard Edition) - myMCMlife.com

DIY: Modern Wood Fence and Gate (Courtyard Edition) - myMCMlife.com

He quickly stained the fence using deck stainer and sealer while Ali and I were having a snack. Just before dark, it was finished. Time to go out for dinner!

DIY: Modern Wood Fence and Gate (Courtyard Edition) - myMCMlife.com

A couple days later, I took some finished pictures.

DIY: Modern Wood Fence and Gate (Courtyard Edition) - myMCMlife.com

DIY: Modern Wood Fence and Gate (Courtyard Edition) - myMCMlife.com DIY: Modern Wood Fence and Gate (Courtyard Edition) - myMCMlife.com DIY: Modern Wood Fence and Gate (Courtyard Edition) - myMCMlife.com DIY: Modern Wood Fence and Gate (Courtyard Edition) - myMCMlife.com

A hook and eye (attached to the house) hold the gate open.

DIY: Modern Wood Fence and Gate (Courtyard Edition) - myMCMlife.com

A hinge door stopper (the same kind we used inside) keeps the gate from hitting the side of the house.

DIY: Modern Wood Fence and Gate (Courtyard Edition) - myMCMlife.com

DIY: Modern Wood Fence and Gate (Courtyard Edition) - myMCMlife.com

I love how the fence and gate make our courtyard feel so cozy and private. We can sit out here with the toddler and the dog and not have to worry about either wandering out toward the street. This is quickly becoming one of our favorite spots for lunch alfresco, afternoon tea, blowing bubbles for Ali, and evening chats. It’s going to be even more wonderful once the landscaping matures.

All of my posts related to “modern wood fence”

Modern Wood Fence —Finished! (at our previous house)

Enclosed Courtyard (intro to this post, including some before pictures.)


Enclosed Courtyard

03/19/2013

One of our loftier wish list items for our dream house was an outdoor “room,” like a courtyard or atrium. Our architect surprised us with a courtyard was the front entrance to our home. To save money toward the end of construction, we decided we would add the fence and gate to enclose the fourth wall on our own. We finally had a beautiful weekend and time to do a quick project together. Jason and I used the same technique as the modern wood fence we built at our last house. Without the fourth wall, it didn’t really feel like much of a courtyard at all.

IMG_1510 IMG_1512

Now it feel more complete!

IMG_1587 IMG_1590

Welcome…

IMG_1592 IMG_1596

We’ve got our own private retreat. This is quickly becoming our favorite spot for lunch and afternoon popsicles. As it gets warmer, I’ll probably start spending my morning time with God out here, sipping a cup of tea.

IMG_1597 IMG_1599

I’ll do a follow up to this post with pictures of our process, as soon as I get around to editing all the photos.


Courtyard: Before, Concept & After

12/31/2012

The week before last, we had a load of 5 tons of gravel delivered to our courtyard. Jason graciously spent most of a Friday spreading about 3.5 tons. (The rest will be used somewhere else.) I was so tired so walking through the mud to get to the lovely paver stone path Jason made up to our front door steps…and mainly tired of Lucy getting her paws muddy. We’re taking our landscaping one step at a time but there are a few big things we wanted to tackle ASAP. The courtyard is a high priority to me because it’s the front entrance, the first impression of our house, and we’re expecting a lot of guests in the first weeks and months in our new house. When I looked at the pictures I took of the courtyard, I realized it came out really, really close to my Photoshop rendering!

Before:

IMG_6330

Rendering:

frontdoorpaintmockup

After:

myMCMlife.com - courtyard at Christmas 2012

I love how the windows reflect the sky.

We’re going to add a short fence and gate between the corner of the garage and the concrete wall to enclose all 4 sides and make it a true courtyard. Here’s the mock up I sent to our contractor, based on the fence we designed and built for our last house.We ultimately decided to keep this element out of the construction budget. Jason and I will build this, hopefully in January.  The opening is only 12′ across so it’ll be so easy compared to a whole fence. And maybe will inspire us to add some privacy fencing around the backyard later in 2013.

mockup


Modern Wood Fence — Finished

06/13/2011

I was going to do a little photo tutorial on building wooden fence gates but Jason had to go and build these while I was at work. I’m really not upset but you’ll have to go somewhere else if you’re looking for a step by step.

Let’s just celebrate together that the gates are done!

Our weedy yard is on the other side of the fence along with our fruit trees, ugly black compost bin and our vegetable garden (behind the compost).

The gate pictured above is so tall that from the inside we couldn’t reach over to unlatch it. The solution was to add a pulley chain to the gate latch. I got all handyman on it and went to hardware store myself to buy chain and eye hooks. See what I did here?

But then I got all woman on it and used a paperclip to attach the chain to the latch because… it worked. And it was easy.

I realize the paperclips are not really a great long term solution. Did I mention this is not a step by step tutorial? I’m pretty proud of myself, though. Just pull to open. I think Jason will be pleasantly surprised when he gets home. I hope the paperclips last that long…

This section of fence separates our patio from our driveway. (Once, a long, long time ago this was all just one big concrete parking slab.)


This path leads through the gate into the yard (where the compost bin, fruits and veggies live).


Modern Wood Fence — Step 7: Windows

05/16/2011

A month ago I published Step 6: Almost Done… Well, we’re still almost done with the fence. Which means not done yet. I needed to refocus our attention on inside projects to get our house ready for our home study. So we STILL have to finish staining, patch some gaps along the bottom and add gates to our lovely modern wood fence.

I haven’t told you about these “windows” yet, though. We have a beautiful flowering plum tree that was in the way of our fence. We didn’t want to mangle one side of the tree by sawing off branches so we decided to build the fence around the tree. Or is it build the tree into the fence. Or build the … nevermind. See what we did here?

In one section we only used half of a plank, attaching one end to the 4×4 post and the other end the 2×4 support post. In another section, we created a small window, bracing a short plank to the planks above and below it using a scrap piece of plank. Did I say plank enough times for you? And yes, I, too, am curious how this is going to affect the tree and fence in years to come…

————————————————————–

Step 1: InspirationStep 2: PlanningStep 3: PostsStep 4: ProgressStep 5: Transport, Step 6: Almost Done…


Modern Wood Fence – Step 6: Almost Done…

04/11/2011

When Jason and I had a rare Saturday together with nothing scheduled, we took advantage of the time to work like crazy trying to finish the fence. We got up early (a feat in itself) and worked up until evening when we had friends coming over for a dinner party. We were working so quickly and efficiently that I couldn’t stop and take pictures along the way. But I can tell you what we did. A lot more nailing planks, cutting planks, nailing planks and cutting planks. We just have one area left, near the deck:

When I came home from work one day last week I found Jason staining the fence with deck sealer. He was able to finish the inside but hasn’t had a chance to stain the outside yet.

This section (the one on the right) is especially dear to me. Why? Because I nailed it all by myself. After absorbing the shock of 5,000ish shots from the nail gun, Jason’s shoulder needed a break. While we waited for the ibuprofen to kick in so we could keep up our pace, I took over nailing a section. Clearly, I’m quite proud of myself.

Jason is definitely faster at though, and it’s hard work, especially above elbow height so I was happy to hand the gun back over to the boss. Here are some pictures of the rest of the fence which is mostly finished from the inside.

The last post against the house is a 2×4 that is not sunk into the ground. Eventually we’ll get around to anchoring it into the mortar of our brick house. For now, it’s wedged tightly enough that it’s holding the fence up straight.

Side note: this dogwood tree looks amazing this spring!

Side note: the bottom of the birdhouse is falling off. Thankfully no birds live there. Actually, that’s probably why no bird live there.

We’re really please with how it turned out. We still have some areas along the bottom that need closed up, in addition to more staining, finishing the area around the deck and adding 2 gates.

————————————————————–

Step 1: InspirationStep 2: PlanningStep 3: PostsStep 4: Progress, Step 5: Transport


Modern Wood Fence – Step 5: Transport

04/04/2011

I tricked you… my last update on the fence showed our progress of staining, nailing planks and troubleshooting and I said the next update would be more of the same. Jason and I worked really hard all day on Saturday trying to take advantage of a rare day off together and the gorgeous weather. We worked so fast that I didn’t stop to take a single picture. Except for this one of our last load of wood from Lowes.

These are our vehicles. We don’t have a truck, a van or an SUV. (Although we secretly wish we had a minivan!)  We have compact and mid-size sedans and we make them work. We lost track of how many roundtrips to the hardware store it took us to get all the wood for the fence. Probably around 7 or 8 trunk-loads.

Lowes was running a sale the past 5 days that was definitely working in our favor. With every transaction we were given a coupon for $10 off our next purchase of $50 or more. Each trunk-load cost approx $100 so we saved at least $30 this weekend with our last 3 trunk-loads. We weren’t planning that or trying to cheat their system, it just happened that way.

Pictures of the actual fence progress will be coming soon. We have a couple more sections to finish with planks, a few troubleshooting areas, some finishing details, 2 gates to make and a whole lotta staining left to do.

————————————————————–

Step 1: InspirationStep 2: PlanningStep 3: Posts, Step 4: Progress


Modern Wood Fence – Step 4: Progress

03/31/2011

I don’t have a concise title for this post. I was going to call it staining posts, spacing and nailing planks and troubleshooting but that seemed to long. Also, the next step is going to be more of the same.

I failed to take any pictures while we worked on this first side of the fence so here it is. You’ll notice that about half-way between each 4×4 post (that’s either anchored to the concrete with an EZ Post bracket or concreted into the yard) Jason added another vertical 2×4. Each plank is nailed to this 2×4 to keep the planks from warping or bowing out between the 4×4 posts, which are a little less than 8′ apart.

This is where we left off when we had to go buy more wood. We just have a sedan so it takes a lot of trips to the hardware store to get all this wood.

Our handy EZ Post brackets cause a minor predicament because the planks couldn’t be nailed into the post for the bottom 6″ or so. That is enough room for pesky disgusting cats to get into our garden. Not acceptable.

Jason came up with this solution to add 2x4s along the sides of the posts at the bottom so he’d have something to nail the planks into.

That works.

Here’s a look from the other side. Lucy approves.

We’re using this scrap of wood as a spacer to make all the planks equal distance apart. When we’re working together (and I’m not taking pictures) it moves a lot faster because I get the next plank ready and place the spacer while Jason does the nailing. (Oooooh… I love those sexy arms!)

Proper fence etiquete is to put the outside, finished side of the fence facing your neighbors and to put the backside facing your own yard. Because this fence is not going around the perimeter of our yard—and we may some day add a perimeter privacy fence–we opted to put the finished side facing in. That created another slight problem when it came to the first corner. Jason came up with a clever solution using a 2×4.

Here’s an illustrated top view of the corner solution:

Nice and clean looking on the inside corner.

We’re using 8′ long planks and we purposely put the fence posts less than 8′ apart so we could trim off the excess and get all the ends clean and square at every post. Jason set his circular saw to the depth of the planks (they’re 1×3’s so approx 0.75″) and trimmed off the ends of the planks at the center point of the post.

It’s fun to watch.

Here’s what the other side of the post looks like. The planks are cut at the halfway point of the post so that Jason has room to nail the planks for the next section of fence.

We may or may not have learned this lesson the hard way on the first post: make sure you put all the horizontal plank nails only into one side of the post.

Because in the next step, you’ll be adding more planks to the other half of the post.

Excess post is cut off with the circular saw. (We got one 10′ post for this corner because of the height variance from the patio down to the yard. Not necessary, obviously.)

So here is where we left off. Out of wood. Out of time. And it got cold out.

We’re hopeful we can get it done in the next couple of weeks. Notice where Jason started testing out the stain/sealer.

The finished fence should end up looking just like this architectural trellis on the face of our house:

————————————————————–

Step 1: InspirationStep 2: Planning, Step 3: Posts


Modern Wood Fence – Step 3: Posts

03/22/2011

Our fence plan required 19 posts, 6 of which needed to go across concrete to divide our parking area from our patio. We wanted the fence height to be 5′ on the patio side—high enough to create some privacy and division but not too high that our friends can’t peak over and say hi when they arrive for a cook out. We were able to by 10′ 4×4 posts and have them cut in half at Home Depot. Obviously, we needed 3 posts for this. Here’s a sort of before shot, where Jason is checking the height to make sure it’s good. I was standing at our back door to that this shot.

You can’t dig post holes in concrete, obviously. Jason’s had some experience with attaching fences to concrete in the past so he knew stability can be tricky. We found these great E-Z Base post bases at HD that are made just for this purpose. They’re hard to find and a bit pricy (around $15 each) but they work great. Four deep screw holes need to be made with a powerful hammer drill. We found some handy 4″ concrete anchors in the same section at the store.

The trickiest part of using these E-Z Bases was getting them onto the 4x4s. They’re made to fit as tight as a glove for obvious reasons. We found the best technique was to get them partly on the post with our hands and then slam the post and E-Z Base against the ground. It took a few slams but the post would gradually slide down into the base all the way. They’re very sturdy. Jason is making sure they’re straight and level.

The rest of the posts were done the regular way. We have a manual post-hole digger and Jason is a post-hole-digging-machine. He got the 11 holes dug, 2′ deep, in a matter of hours. We got 8′ 4×4 posts for the rest of the fence. With 2′ underground, we’ll still have plenty left to get a level 5′ fence and trim the tops off the posts. Jason bought fence post concrete to put in each hole. (Who knew they made that?! It’s fast setting!) Half a bag of concrete and half a gallon of water was needed for each hole. Concrete is cheap. It dries so fast it and it wasn’t windy so most posts didn’t need any additional support and Jason was able to level them as the concrete was setting.

I helped Jason level and set the last few posts after the sun went down. This is Jason’s third fence building project and he said he finished the posts much faster than he expected.

On to the planks… (Is that the right term? That’s how we refer to our horizontal fence pickets.)

————————————————————–

Step 1: Inspiration, Step 2: Planning


Modern Wood Fence – Step 2: Planning

03/14/2011

We decided to put a fence just around our patio and garden rather than the whole backyard. Partly to save money and partly because we primarily use the patio and as I mentioned, we like the feel of a defined outdoor living space. We’ll be using 4×4 treated pine posts, a little less than 8 ft apart, and untreated pine 1″x3″x8′ horizontal planks. Half way between the 4×4 posts, we’ll add 2×4 vertical boards to keep the horizontal planks from bowing and warping. Then, the whole fence will be stained with deck sealer (all the same color). We’ll have two gates: one from the driveway and one into the yard from the stepping stone path. Here are some illustrations I did of our fence design:

We’ll probably come back at the end and put 1″x4″s over the nailed sides of the 4″x4″ posts.

————————————————————–

Step 1: Inspiration