Before & After: Bookshelf

04/11/2013

From ugly, cheap bookshelf to cute, cheap bookshelf!

IMG_1601 IMG_8508

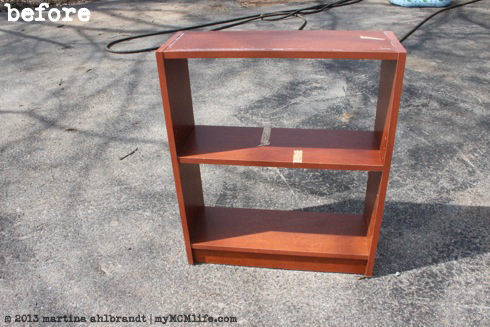
While on the hunt for a dresser for the next kids’ room, I came across this little piece of junk bookshelf. It’s pressboard with a wood patterned laminate and it was dirty and wobbly. BUT… it was only $6.99 and I couldn’t resist! I’m on the lookout for bookshelves for the kids bedrooms, the den, my office…basically, I could use a lot of bookshelves in a lot of places.

My dear husband is the perfectionist when it comes to home projects. When I was in elementary school my mom bought me a poster of a kitten covered in paint that said “I’m not messy; I’m creative!” That pretty much sums up the way I do projects, which Jason can surely confirm. He also calls me the Swedish Chef as he’s cleaning up after me in the kitchen. All that to say, I painted the heck out of this thing. I was experimenting as I went. First I tried gray primer spray paint but it ran out. Then I tried flat black spray paint. (I’m a horrible spray painter, by the way.) That ran out too so I changed tactics and went with white ceiling paint for primer because we have a 5-gallon bucket of it in the garage. That worked. Then I painted it with the same quart of Glidden wall paint that I’ve used for the little nightstand dresser in Ali’s room and the recently purchased dresser. I figure maybe one day they’ll all end up in the same room. It took me 3 coats to cover this thing! Even after all my “primer” coats.

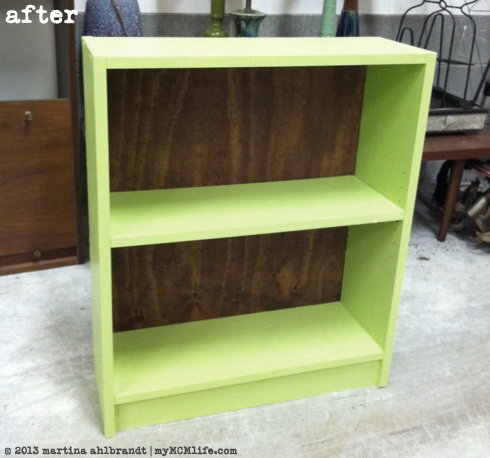
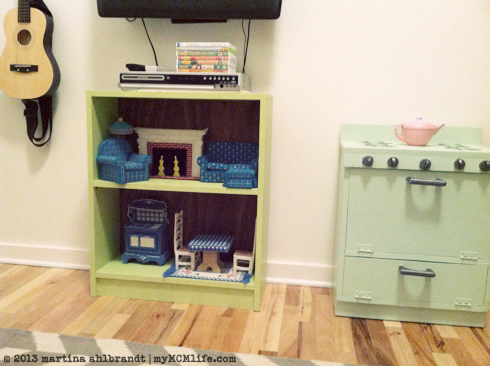
Before painting, I had added a few screws into the sides to try to stabilize it. They helped but I realized that it originally had a panel on the back, which would have helped the corners stay square. I came up with the idea of adding a piece of stained plywood to the back. We had the stain on hand. I used a rag to rub it onto the face and the edges of the plywood. When it was fairly dry (OK, not really…I was impatient…) I tacked it onto the back of the shelves with finishing nails. I really love how it turned out with the Granny Apple green and the American Walnut (color) wood. Oh, and the only thing I had to purchase was the plywood, which was around $10 and I had cut to size (from a 2’x4′ sheet) at the store. So this whole deal cost about $17.

IMG_8527 IMG_8529

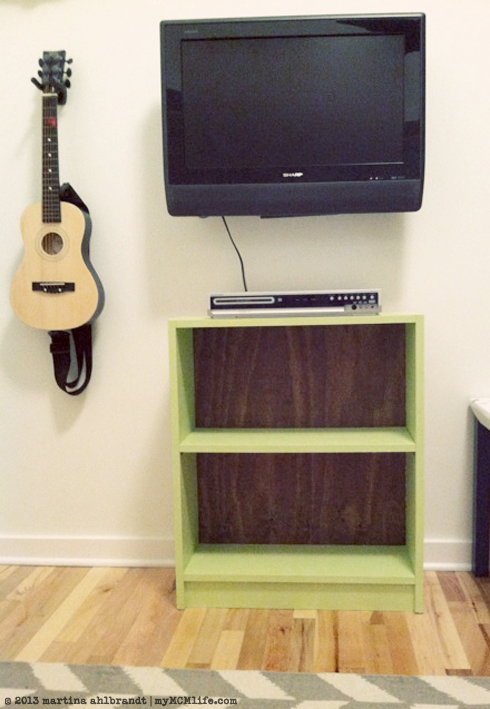
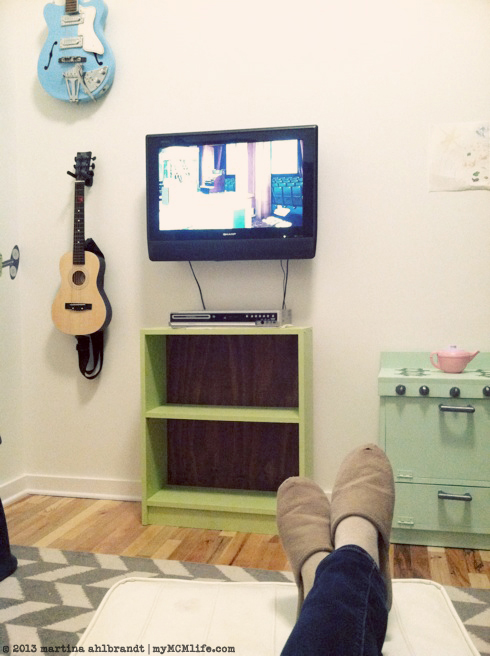
For now, it’s residing in the den. I needed a spot to put the DVD player so this room could start feeling more like a den and less like a playroom. I was also excited to have a spot to set up some of the awesome Barbie furniture my Granny made me. I could only fit about 1/4 of it on the shelf but that’s fine for now.

IMG_8531

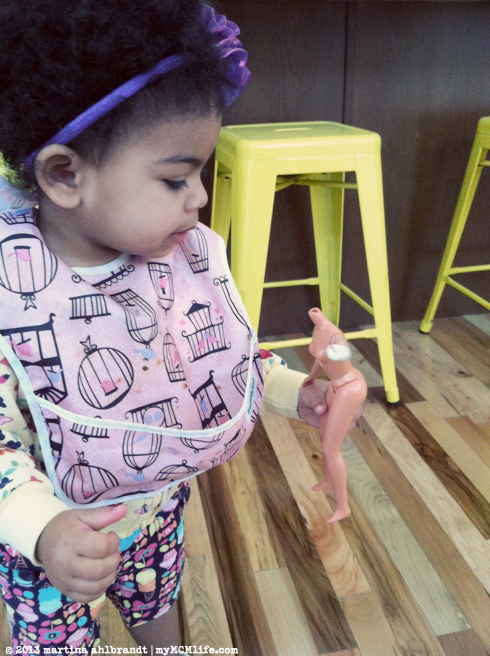
Ali immediately said “House!” when she saw it and she’s pretty excited about these two mutilated “Darbies” from my childhood.

IMG_8532

The blonde has a broken neck and Ali is quite concerned about her head popping off. She brings it to me every time and says, “Oh no, Mama!” They’re both naked, missing one limb (from a dog attack) and have butchered haircuts. Based on how rough Ali plays with them, though, I think I’ll wait a year or two before buying her any new Darbies.

IMG_8552

Advertisement

Courtyard: Before, Concept & After

12/31/2012

The week before last, we had a load of 5 tons of gravel delivered to our courtyard. Jason graciously spent most of a Friday spreading about 3.5 tons. (The rest will be used somewhere else.) I was so tired so walking through the mud to get to the lovely paver stone path Jason made up to our front door steps…and mainly tired of Lucy getting her paws muddy. We’re taking our landscaping one step at a time but there are a few big things we wanted to tackle ASAP. The courtyard is a high priority to me because it’s the front entrance, the first impression of our house, and we’re expecting a lot of guests in the first weeks and months in our new house. When I looked at the pictures I took of the courtyard, I realized it came out really, really close to my Photoshop rendering!

Before:

IMG_6330

Rendering:

frontdoorpaintmockup

After:

myMCMlife.com - courtyard at Christmas 2012

I love how the windows reflect the sky.

We’re going to add a short fence and gate between the corner of the garage and the concrete wall to enclose all 4 sides and make it a true courtyard. Here’s the mock up I sent to our contractor, based on the fence we designed and built for our last house.We ultimately decided to keep this element out of the construction budget. Jason and I will build this, hopefully in January.  The opening is only 12′ across so it’ll be so easy compared to a whole fence. And maybe will inspire us to add some privacy fencing around the backyard later in 2013.

mockup


Douglas and Davy – Dining Chair Pair

07/16/2012

Douglas and Davy – that’s what I named this set of dining chairs. We found them at Goodwill a few weeks ago covered with stinky, tacky brown vinyl and bleached maple wood. In our first attempt at professional reupholstery (by “professional” I mean self-educated and with all the proper tools this time), we completely restored these chairs. Stripped off all of the old upholstery and padding, removed all the staples and tacks, refinished the wood legs with walnut stain, and reupholstered them with fresh padding and new upholstery. We’re quite pleased with how they turned out.

Before:

After:


Phone Photo Friday

07/06/2012


Design*Sponge at Home, in Nashville!

11/28/2011

Are you a fan of Design*Sponge? It was one of my first favorite blogs and I’ve gotten a lot of inspiration through the site in the past few years. We submitted a before and after project a few years ago, some old office chairs we found in a dumpster and turned into a patio bench and chair. About a year ago, I was contact by one of the staff at Design Sponge asking if they could include our project in their upcoming book. Of course I agreed.

Well the book, Design*Sponge at Home, is out! Grace Bonney and the team have been doing a national book tour. When I found out they were coming to West Elm in Nashville on November 15th, I quickly bought a ticket to the pre-party craft event, which included a copy of the book and the opportunity to meet Grace and get my book signed. (Little did I know Nov. 15 was going to be such a crazy, landmark day in our lives…)

Page 349

I went alone but ended up meeting a girl who lives on our street and running into a friend of a friend I haven’t seen in years. (Renata, Jenni says hi!) Since I arrived late, I got a short personal tutorial from Grace on how to make a freezer paper stencil to create a custom hand painted cloth napkin.

After the craft, Jason came to meet me for snacks, silly photos in the photo booth, and to get our book signed by Grace. (He took the photos with me in them. Thanks honey!) Grace seemed genuinely excited to meet us and asked more about our bench project. Plus, I now have my very own signed copy of the gorgeous book sitting on our coffee table, ready to inspire a bunch more projects.


Fireplace Makeover: Removing a Brick Hearth and Retiling

05/24/2011

Here’s our fireplace before. It’s basically looked the same since we bought our house except the walls were builder’s beige and the trim was white. The fireplace is brick inside, painted black, with tan 1 sq. ft. marble around the outside.

The problem is that it sticks out into the living room, right into the foot path. Adults, kids and even dogs have tripped on it. And those corners are SHARP! Nerve-wracking for some of our friends with little ones.

See how far it sticks out into the traffic path of the room?

And it eats up precious floor space.

We could tell the wood flooring had been cut around the fireplace base (referred to as “hearth” from here out) when the house was built 56 years ago, but that the built out fireplace with space above for a TV and marble hearth had been added when the house was renovated just before we bought it 4 years ago. We were curious what was under the tile but it had never occurred to Jason or me that under the tile would be brick…

We’re guessing that this brick slab was originally built into the living room to serve as a platform for a wood burning stove. Our house doesn’t have a chimney or a functional fireplace and based on some neighbors that still don’t have central heat and air, we can assume that our house originally didn’t either. So how do you remove a brick hearth?! You Google it. Then you buy a brick chisel, get out your hammer, put on a dust mask (ASBESTOS ALERT!), googles, gloves and have at it. We also laid down an old sheet to protect our wood flooring and covered our TV with a blanket. It was a dusty, dirty, labor-intensive job. Chunks of mortar were flying. Jason did all the chiseling and I moved the bricks out of the way into a box. The worse part of the chiseling was splitting bricks in half. When I took the photo below, there were still 7 bricks that needed to be chopped in half. Once they were out, reconstruction could begin!

When we got to the hardware store we decided on 4″ tumbled multicolor slate. I love the way the slate tiles turned out in the floor of our hall bath (photo here) and it’s nice to have some consistency throughout the house. The variation of size and color and the rounded corners made these very forgiving and easy to work with. No need for spacers or getting everything perfectly square, at least not for an area this small. Also, they were cheap: only $3.97 per square foot. (This project ended up being 8 sq. ft. I believe.)

Before tiling could start, we had to patch in new drywall around the sides and top of the fireplace. We put tile backer board on the base of the fireplace which is made of cement so it’s sturdy for walking on. We had to glue it down with Liquid Nails (and a little Thin Set tile adhesive) because the subfloor here was uneven concrete. Jason adhered the tiles with Thin Set and a grooved trowel.

As I mentioned, these tiles are very easy to work with. My job was to open the packages and hand Jason the tiles as he spread out the Thin Set and set the tiles in place.

Ta-da! We only had to cut 6 tiles. Natural stone tiles really should be cut with a wet saw but we don’t own one and couldn’t justify renting one just for 6 tiles. So we used a hammer and brick chisel. Not perfect but good enough for us. “Grout covers a multitude of sins,” we like to say. Once the adhesive was dry (after about 24 hours) the tiles were ready for their first coat of sealer. We used a matte sealer that’s made for porous natural stone. This is necessary to do before grouting or the grout won’t wipe off the tile faces.

Several steps happened between the photos above and below but I was too involved to photograph. After the first coat of sealer is dry, 15 minutes maybe?, it’s time to start grouting. Since this was a small area we bought pre-mixed grout. It’s more expensive than the powder bag but obviously easier. Grouting is a two person job. Jason spread the grout over the surface of the tiles and pressed it into all the cracks using a rubber trowel. (You can imagine why it’s important that the adhesive Thin Set is completely dry or tiles will start shifting.) I started wiping grout off with a large, damp sponge and a bucket of warm water. It doesn’t have to be warm but if feels nicer to my rubber-gloved hands. The sponge does need to be thoroughly wrung out though. Too much water will thin and breakdown the grout. It takes many swipes of the sponge to get all of the grout off the faces of the tiles. The grout starts drying and sticking to the tiles in about 10 minutes so it’s a fast moving process. I actually really enjoy this process and I feel like I’m quite the grout wiping expert after tiling our humongous master shower. Once the grout was dry, another 24 hours to be safe, the tiles and grout get another coat of sealer. This time it’s to make sure the grout gets sealed. Jason added simple, square-edge white trim around the sides and top of the fireplace to cover the holes left from the original trim. He then painted it white with trim paint. He also touched up the brick base and insides of the fireplace with black spray paint. (I couldn’t photograph these steps because he did them while I was at work.)

We are soon going to be repainting our living room in Greek Villa by Sherwin Williams so I asked Jason if he’d brush some onto the drywall around the fireplace so we can get a feel for how it’ll look finished. Imagine it without the box of bricks and the blue wall with drywall mud patches on the right.

No more sharp-enough-to-bust-a-head-open intrusion sticking out into the living room.

No more toe-stubbing and tripping on cold, hard marble.


Fireplace: Before & After

05/23/2011

We refinished our faux fireplace. Tomorrow I’ll tell you why and how.

Before:

After:


Painting Furniture – Nightstand Before & After

04/19/2011

We bought this little nightstand dresser 2 years ago at a yard sale. At the time we didn’t know where to put it. We can’t fit a nightstand like this in our bedroom and we already had end tables in our living room. It moved into the spare room to sit in waiting for our future kids. Over a year ago, Glidden was giving away free quarts of paint. I ordered Granny Apple green with this night stand in mind. Then, 2 weekends ago I FINALLY got around to standing and painting it. (It felt SO GOOD to get that of my to-do list after being on there for months.)

The top had a bunch of knicks and dings in it but look at the cute flowered contact paper inside the drawers! That stays.

The first order of business was to take off these hideous handles. Have you ever seen anything like this? It looks like it was hand-crafted by drunk termites.

After I got those suckers off, I filled the screw holes with wood filler. Here’s the part where I begin to just wing it. Jason usually does this kind of stuff and I just supervise. I followed the direction the tube and waiting for it to dry a bit, then sanded it. I started sanding the dresser top and the drawer fronts too. That got old really quick.

Thankfully, paint covers and fills most minor scratches. I did give the whole thing a rough sand so the paint would stick better and then wiped it clean with a damp cloth. The first coat of paint didn’t cover very well. I did my best not to have a bunch of drips (again, Jason usually does this kind of project. I am NOT a perfectionist!) I wasn’t concerned about our old patio table because it’s sagging and it’s going to be replaced this summer when we build a new one. I waited a few hours for the first coat to dry (while I went on to paint the chalkboard door). The second coat covered much better.

I let the nightstand rest and cure for a full week before I put anything on it. Even after that, I put a semi-heavy boom box on it and the next day it was stuck. Thankfully it didn’t leave a mark when I pulled it off. I wonder how much longer it needs to cure. Anyone? Or maybe it needs a clear coat?

I was going to buy new knobs but Jason reminded me that we had some in the tool box from IKEA years ago. (I can’t even remember what we used these for originally.) We had 4 so I decided to do 2 on each drawer. I’m very happy with how it turned out and pretty darn proud of myself for doing this all on my own. (Color is more accurate above… the flash here makes it look more yellowish than it is.)


Chalkboard Door: Before & After

04/12/2011

Our house originally had lovely wood doors but when it was renovated (before we purchased it) everything was painted a fresh, clean white. At one point Jason thought he’d like to strip all the doors back to their original wood. These closet doors we were able to just flip around. After Jason started stripping the back of this door, in our spare bedroom, we quickly realized it was going to be more work than it was worth. Since this room belongs to our future kids, I thought it would be a fun solution to repaint the door with Rustoleum chalkboard paint. (Inspiration came from these closet doors.)

I suppose this not a true after because I haven’t actually tried the chalkboard yet. It’s supposed to cure for a couple days before chalk is applied to the whole surface. So really, it just looks like I painted the door black. But I had to blog about something, right?

——————————————

UPDATE:

After 5 days, the surface is supposed to be cured by rubbing a piece of chalk all over the surface of the door. Bye-bye crisp black door. This required an entire stick of chalk and made a huge dust mess!

The instructions say not to use water on the door yet and I don’t have an eraser so I wiped the whole surface with a dry rag. And tested it out. And then wiped it again.

When a full week has passed, it’s ok to use a damp cloth on the door. It didn’t return to the original black. I think it’s because of the rough texture of the paint. Also, I probably should have rinsed the rag and rewashed it several times but, eh.

I wrote my new favorite verse and manta of foster parenting on the back of the door. Writing on the door produced quite a bit of chalk dust on the door. I’m not happy about that. Maybe it’s the quality of the chalk? Or just the nature of the rough chalkboard? In general, though, I like this project and I don’t have any regrets.


Retro Renovation Love

02/03/2011

I got a ping-back notice that my Hall Closet Turned Home Office (AKA Cloffice) was mentioned on Retro Renovation today. RR is the flagship of mid-century home blogs. I’m flattered! I had no idea that my little blog was on their radar. If you’re a new visitor here after seeing our recent renovation project on Retro Renovation, WELCOME!