Mission Accomplished: It’s a Dresser

03/18/2013

IMG_1648

My big goal for this weekend was to find a dresser for the bedroom our future foster kids will stay in. Eventually, I’d like to add a beautiful vintage dresser but for now we just needed any dresser. I found this specimen for $22.99 at a thrift store in our neighborhood. I spent about 3 hours repairing, sanding and painting it. I spent another $12 on handles and hardware. It’s not big but it will work for now. I painted it the same color green as the little 2 drawer nightstand I painted a couple years ago for our first kids’ room that’s now in Ali’s room. Eventually they may end up in the same room. So here’s my wonky little weekend DIY project, before:

IMG_1603

And after:

IMG_1650


I need to call our case worker to double-check but I believe all of our requirements to reopen our home as foster parents are now met. BIG SIGH!

Related posts:

Preparing for Foster Kids: Bedroom Tour (the 1st time)

New Home Tour: Nursery (Alianna’s Room)

Room to Grow: Making a Bedroom for Foster Kids (the 2nd time)

Advertisement

ReAbide additions

01/01/2013

We had our first official ReAbide sale just before Christmas:

invent-stor-mbdress

Over the weekend Jason and I set out to find a replacement (and anything else we could find!) We were thrilled to find this Bassett long dresser. It was in pretty rough shape but Jason is truly a restoration artist! He got started on it right away, sanding, staining, polyurethaning. It was not 100% done before he had to go out of town for work so it’s not officially in the shop yet.

399995_10151384093728200_1679501076_n-1

I also updated a few pictures and added some new items to the ReAbide website and Facebook page.

invent-tab-1200501J

invent-light-1002001F_2 invent-light-1002001F_1 invent-light-1001001F_2 invent-light-1001001F_1 invent-seat-1106002B

We’re excited to get rolling in 2013, doing more furniture pickin’, restoration, selling and staging. Happy New Year!


A New/Old Dresser

07/07/2011

Feeling the pressure of our home study and inspection encroaching, I purchased a less-than-ideal dresser on craigslist a couple months ago.

What we wanted: a mid-century, not to wide, medium stained wood, changing-table-height dresser. Like this inspiration board picture:

What we got: a modern Target brand, dark reddish-brown wood, not too wide, a little too tall for changing table height dresser.

I had been searching craigslist, thrift stores and estate sales for months for the ideal dresser and hadn’t found it. On Sunday Jason suggested we stop by Pre-to-Post Modern, a retro and vintage store in Nashville, just for fun. There I discovered the perfect dresser. A mid-century, not to wide, medium stained wood, changing-table-height dresser.

Thank God, we resold the first dresser on craigslist in less than 24 hours for the same price we bought it for. And the new/old replacement was only $24 more.

Lucy approves. Or perhaps assumed I was taking pictures of her.


Good Question: Missing Dresser Drawer?

06/29/2011

I sent a question over to Apartment Therapy recently for their “Good Questions” column and it was posted last night. Head over there and check it out. I welcome any creative suggestions! Looks like a bunch of good ones are coming in already…


Painting Furniture – Nightstand Before & After

04/19/2011

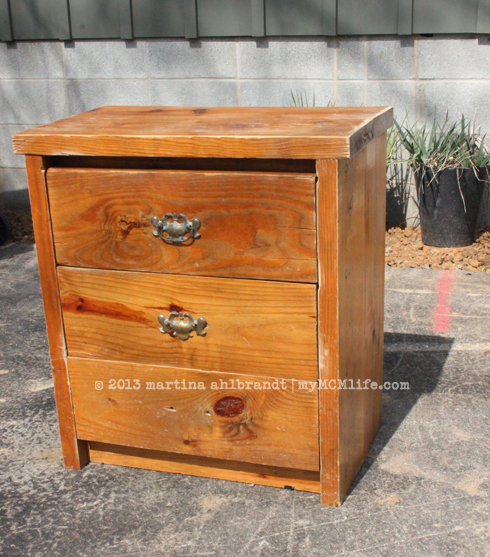
We bought this little nightstand dresser 2 years ago at a yard sale. At the time we didn’t know where to put it. We can’t fit a nightstand like this in our bedroom and we already had end tables in our living room. It moved into the spare room to sit in waiting for our future kids. Over a year ago, Glidden was giving away free quarts of paint. I ordered Granny Apple green with this night stand in mind. Then, 2 weekends ago I FINALLY got around to standing and painting it. (It felt SO GOOD to get that of my to-do list after being on there for months.)

The top had a bunch of knicks and dings in it but look at the cute flowered contact paper inside the drawers! That stays.

The first order of business was to take off these hideous handles. Have you ever seen anything like this? It looks like it was hand-crafted by drunk termites.

After I got those suckers off, I filled the screw holes with wood filler. Here’s the part where I begin to just wing it. Jason usually does this kind of stuff and I just supervise. I followed the direction the tube and waiting for it to dry a bit, then sanded it. I started sanding the dresser top and the drawer fronts too. That got old really quick.

Thankfully, paint covers and fills most minor scratches. I did give the whole thing a rough sand so the paint would stick better and then wiped it clean with a damp cloth. The first coat of paint didn’t cover very well. I did my best not to have a bunch of drips (again, Jason usually does this kind of project. I am NOT a perfectionist!) I wasn’t concerned about our old patio table because it’s sagging and it’s going to be replaced this summer when we build a new one. I waited a few hours for the first coat to dry (while I went on to paint the chalkboard door). The second coat covered much better.

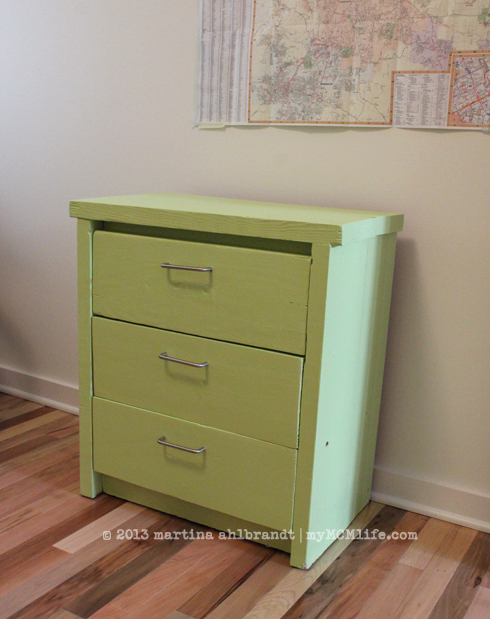
I let the nightstand rest and cure for a full week before I put anything on it. Even after that, I put a semi-heavy boom box on it and the next day it was stuck. Thankfully it didn’t leave a mark when I pulled it off. I wonder how much longer it needs to cure. Anyone? Or maybe it needs a clear coat?

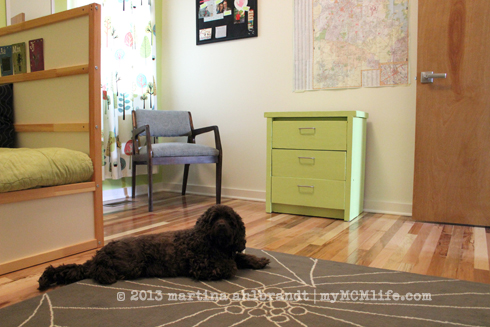
I was going to buy new knobs but Jason reminded me that we had some in the tool box from IKEA years ago. (I can’t even remember what we used these for originally.) We had 4 so I decided to do 2 on each drawer. I’m very happy with how it turned out and pretty darn proud of myself for doing this all on my own. (Color is more accurate above… the flash here makes it look more yellowish than it is.)